
 The Future of Database Tuning - Using ADDM Tasks and Intelligent Advisors to Solve Database Performance Problems
We'll create a not-so mythical performance problem and use the output from an ADDM task to provide us with the diagnostic information and recommendations we need to solve the issue. Along the way we'll look at some of the different features and functionality that ADDM offers.
The scenario
My unit receives an-email from our data warehouse application team lead. He
tells us that a few of the programs in the nightly batch job stream are running
longer than usual. The UNIX folks chime in stating that the AIX server's CPU
activity is higher than normal during the 4 AM to 8 AM timeframes. The application
team lead is concerned that the support units are being asked to analyze a performance
problem that occurred in the past. A fellow DBA responds to his e-mail stating
that since 10G Grid Control's ADDM task executions are stored in a repository, it is a
relatively easy task for us to investigate performance problems that occurred
during previous time periods.
Performance Problem Analysis
I begin the investigation by logging on to 10G Grid Control and navigating to the Database's
Home page. My next step is to click on the Performance Tab which can be
found on the top left section of the panel. 10G Grid Control displays the Database
Performance Home page. The page displays performance information for the
current point-in-time. If you would like to learn more about the information
contained on this page, please refer to my blog titled "Database
Performance Monitoring Using 10G Enterprise Manager."
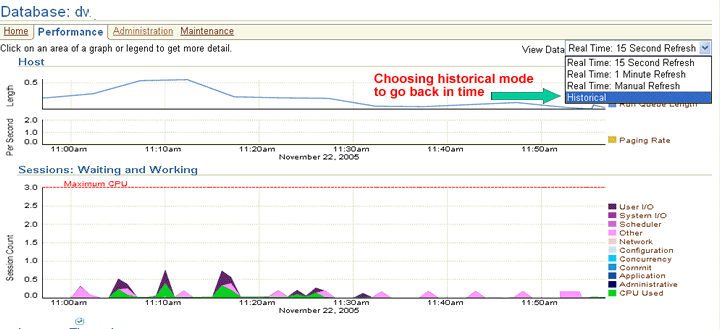
Because I am investigating a performance problem that occurred in the past,
I need to change the page's display from the current point-in-time to a historical
one. I do that by clicking on the "View Data" drop down menu on the
upper
right hand side of the page. The "View Data" drop down allows
us to change the screen's refresh time to meet specific monitoring requirements
but there is also a selection that switches the display from current to historical
mode.
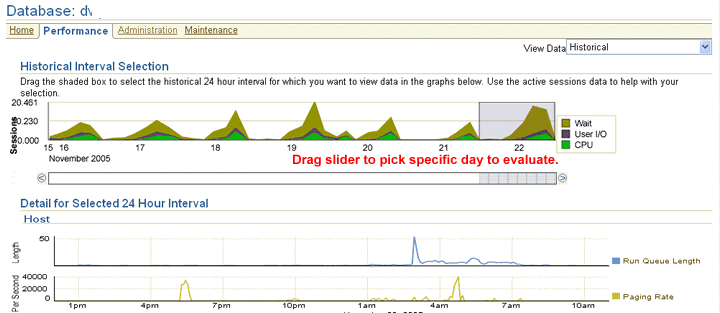
When I choose historical mode from the drop down menu, 10G Grid Control displays the performance page in historical mode. The historical performance panel provides a slider that allows us to select dates in the past. Users can drag the slider to the desired date and 10G Grid Control will automatically refresh the screen with the performance data from that time period. As I stated in an earlier blog, this feature not only helps administrator answer questions like "my program ran long yesterday, can you help me fix it before it runs today?" but also helps to determine exactly when a particular performance problem began to occur. Knowing when performance first "went South" is a critical piece of information that allows you to determine what changes were made since the problem first occurred. This is often all that is needed to identify and solve the performance problem.
We can use the Sessions: Waiting and Working Chart in the middle of the screen to determine exactly what resource our batch stream programs are waiting for. The chart allows administrators to quickly determine where the most waiting time is spent. In our example, we are waiting for I/O. Since this is a multi-terabyte data warehouse, no surprises here. It is important to note that the chart itself provides drill down capabilities. Users can click on any colored area of the chart to show the SQL and Sessions associated with the resource. For more information on the chart's drill down capabilities, please refer to my blog titled "Database Performance Monitoring Using 10G Enterprise Manager." Before we continue our investigation of last night's performance problems, lets take a quick look at the output from an ADDM task.
ADDM Task Output
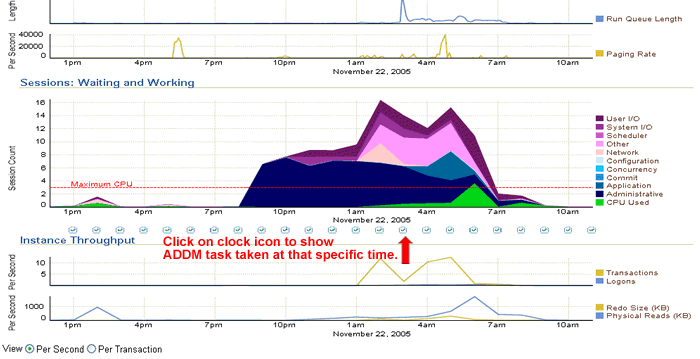
If we look at the chart, we can see that not only is there a spike from 4 AM
to 8 AM, but there is another spike that starts at 1 AM, peaks a little before
2 AM and then begins to descend into the trough until 4 AM when it picks up
again. It may be beneficial for us to also review the output from the 2 AM to
3 AM ADDM run.
At the bottom of the Sessions: Waiting and Working Chart that we have been reviewing, you'll notice that there are a series of clock icons. We learned previously in this series of blogs that ADDM, by default, takes a snapshot every sixty minutes. If we click on the clock icon above the red arrow I have placed on the graphic, 10G Grid Control will display the ADDM task output for a one hour time period ending at the selected time. In this case it will be the time period that starts at 2 AM and ends at 3 AM.
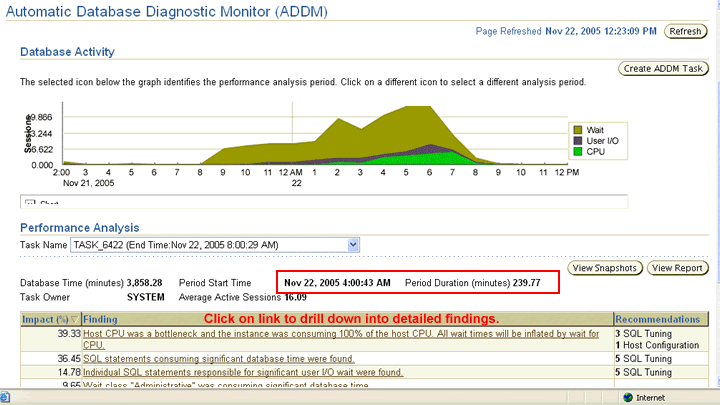
When I click on the clock icon that coincides with the 3 AM ending time, 10G Grid Control displays the ADDM Task Output for the 2 AM to 3 AM time period. The selected clock icon for the ending time is now in blue. The "Create ADDM Task" icon on the top right of the page allows me create a custom ADDM task for a given time period. We'll use this icon to generate a custom run to analyze our 4 AM to 8 AM performance problem in a few minutes.
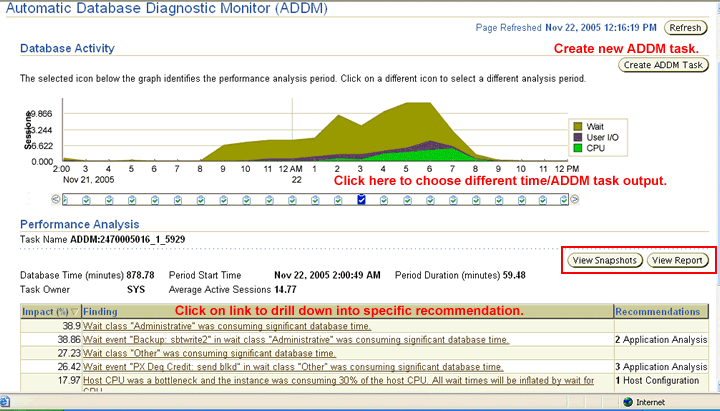
10G Grid Control displays a chart at the top of the ADDM Task Output page that shows database activity. Once again, 10G Grid Control displays a series of clock icons that allows me to quickly switch to different time periods. To display ADDM task output for a different time period, users click on the clock icon for the sixty-minute time period ending time.
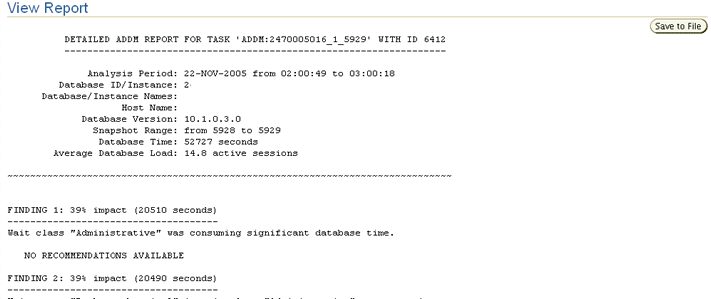
The information in the Performance Analysis section shows that the ADDM task started at 2 AM and ran for a little under sixty minutes. The panel then provides 2 additional icons "View Report" and "View Snapshots". When I click on the "View Report" icon, 10G Grid Control displays the ADDM task output in a pure text report, which can be saved to a flat file. The report contains information about the ADDM task execution itself, performance statistics, and most importantly, the recommendations generated during that time period.
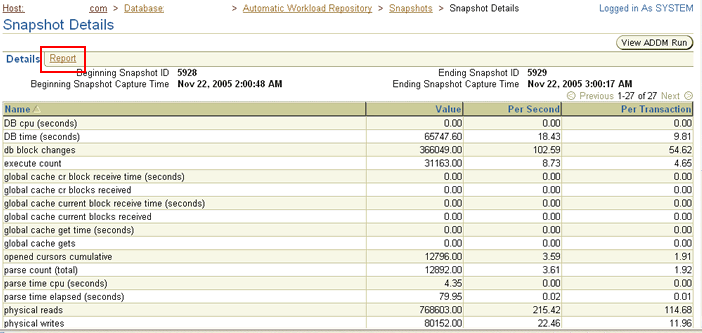
When I click on the "View Report" Icon on the ADDM Task Output page, 10G Grid Control displays a set of detailed statistics captured during the ADDM task execution. If I click on the "Report" tab highlighted in the red box, 10G Grid Control will display a traditional Statspack-style report, which we discussed in my blog titled "Generating Workload Repository Performance Reports and the Future of Database Tuning".
Continuing The Investigation
Let's return to our tuning analysis. The ADDM task output page displays the
ADDM recommendations at the bottom of the ADDM
Task Output page. The listing of findings is categorized (on the far right
side of tabular display) and each recommendation is actually a link that allows
the user to drill down to more specific information pertaining to that finding.
Do you see the second recommendation that has the text "sbtwrite2" in it? I know that we run an RMAN tape backup during this time period. Because the database is so large, we use a LOT of parallel processes to perform the backup. Our first evaluation is complete. I'll talk to the developers to determine what impact that the tape backup has on their job run performance. They record the elapsed times from all of their batch job executions. If we find that the backup is impacting performance, we'll try and move the backup to an earlier time period.
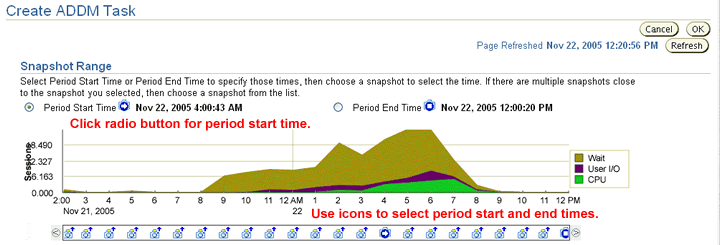
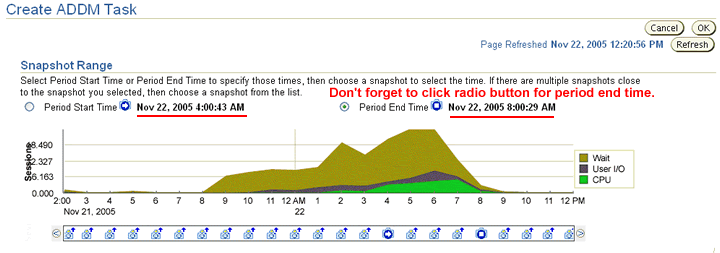
Since I still want to review the time period between 4AM and 8AM, I'll click on the "Create ADDM Task" button displayed on the top right of the ADDM Task Output page. 10G Grid Control displays the Create ADDM Task page. Please notice that the radio button for Period Start Time is already checked. I can use the clock icons at the bottom of the screen to select the 4 AM start time period. After I have selected the start time, 10G EM automatically refreshes the page and shows that I have selected 4 AM as the start time. I must then manually select the "Period End Time" radio button to tell 10G Grid Control that I want to select the ending time period. I always forget to do this and then choose my ending time for my start time. Don't forget to select the "Period End Time" radio button before you choose your period end time.
The Recommendations
After I choose the period
end time, I click the 'OK" navigation button to ask 10G Grid Control to run the ADDM
task. When the task execution is complete, 10G Grid Control displays another ADDM
Task Output page. The page's layout is exactly like the one we have been
reviewing. No changes here. But the findings are different. I'll click on the
top finding (the one stating that "Host CPU was a bottleneck") to
continue our analysis.
10G Grid Control displays the Performance Findings Details page. The first recommendation states that we should consider "Adding more CPUs". Actually, 10G Grid Control is correct in this case. We have been aware that CPU capacity is an issue on this platform for some time. But lets see if we can't tune the SQL that was running during that time to reduce CPU consumption.
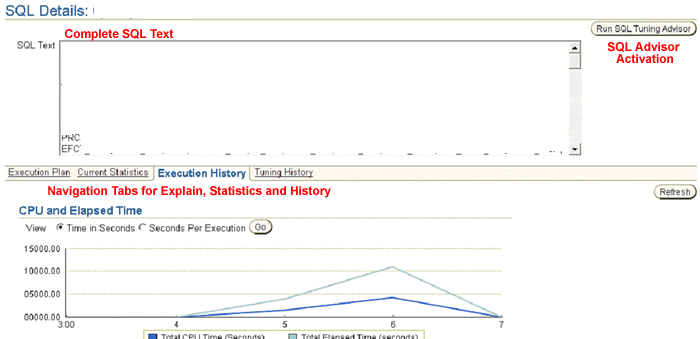
I continued my investigation by clicking on the "Show" link next to the text "SQL tuning". 10G Grid Control displays the entire text of the SQL statement that generated the recommendation. Clicking on the SQL text takes the user to a SQL Details page, which shows the entire text of the SQL statement being reviewed. In addition, 10G Grid Control also displays navigation tabs that allows the users to view the statement's execution plan, current statistics, execution history and tuning history.
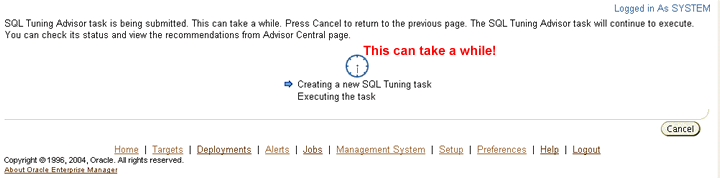
I will run the SQL tuning advisor by clicking on "Run SQL Tuning Advisor" navigation button on the top right hand side of the panel. 10G Grid Control displays the SQL Tuning Advisor Status page. This page is displayed until the advisor has completed its analysis activities. If you would like to learn more about the SQL Tuning Advisor, please visit my blog titled "SQL Tuning Advisor". Pay special attention to my discussion on the resources the advisor consumes.
Why does the SQL tuning process generate overhead? As I stated in my "SQL Tuning Advisor" blog, the Advisor does not have optimization time constraints. As a result, the tool can take as much time as necessary to optimize each statement. You'll certainly get an educated decision from the optimizer, but you may impact system performance to get it.
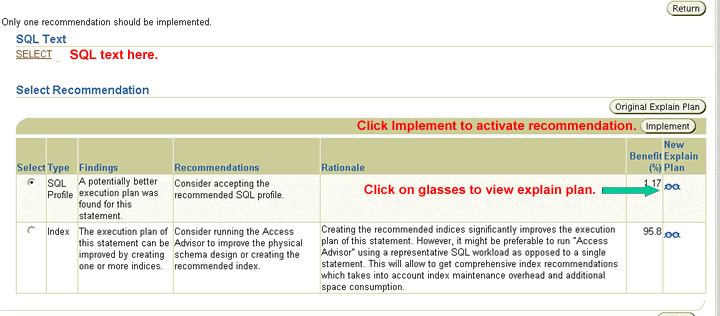
After the analysis is complete, 10G Grid Control displays a Recommendations page. The series of recommendations are displayed in a tabular format. Each row provides a recommendation category, finding, rationale and percentage of benefit. If an alternate access path is recommended, a set of glasses is displayed which allows users to view the new explain plan. The Recommendation page also provides a button that displays the original explain plan to allow administrators to compare the old access path to the new one. Comparing the new and old explain plans is HIGHLY recommended.
IF you hit the implement button and you have the SQL Profile recommendation radio button selected, you will implement it. Be very careful when you hit the implement buttons contained on any of the 10G Grid Control panels. Depending on what panel you are on and the type of recommendation, 10G Enterprise Manager may not prompt you again. To learn more about SQL profiles (and backing them out), please refer to the "SQL Tuning Advisor" blog.
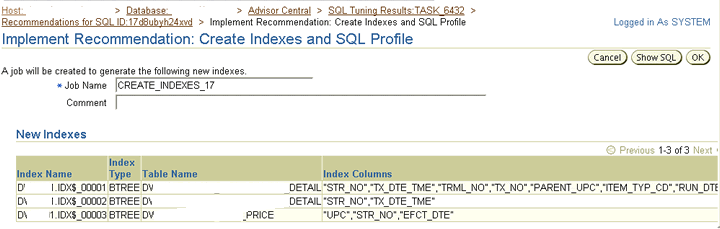
If you choose to implement the create index recommendation, you will not build the index. Instead, 10G Enterprise Manager will display the Implement Recommendation: Build Indexes and SQL Profile" page. If you hit the "Show SQL" navigation button, 10G Grid Control will display the SQL that it will use to create and implement the SQL profile and indexes.
Now is when we have to be very careful, I have seen SQL profiles both highly improve and highly degrade performance. I would NEVER implement a SQL profile without testing it in a development environment first. But it goes without saying that we should test every change in a test environment before implementing them in production.
Let's continue our investigation because those index recommendations are intriguing. When I reviewed the original explain plan, I found that the query was using a B-tree index that did not contain all of the columns in the statement's WHERE clause. After further review, I found that the high CPU was caused by Oracle spinning through an index that did not have sufficient cardinality (number of different values). Indexes, because of their smaller size, are often cached in the database's data buffer cache. The query was thrashing the buffer cache, which can cause high CPU utilization. Chalk one up for DBA expertise.
The most exciting revelation was that the first index recommendation contained two columns at the end that weren't in the WHERE clause. I reviewed the SQL statement's text and found that the last two columns (ITEM_TYP_CD, RUN_DTE) were in the SELECT clause. 10G Grid Control had recommended a index that would generate an Index Only access path, which is one of my favorites. Index Only access paths occur when all of the columns in the SQL statement are contained in the index. You place the columns in the WHERE clause at the beginning of the index and place the columns in the SELECT clause at the end of the index. If the index contains all of the columns in the statement, it does not have to visit the table to retrieve any data. The query can stay within the index structure throughout its execution lifecycle. No table I/O necessary! What I found VERY interesting was that 10G Grid Control was intelligent enough to recommend an index only and placed the columns in the SELECT clause behind the columns in the WHERE clause. An excellent recommendation. Chalk one up for 10G Grid Control ADDM!
I reviewed the other index recommendations and found them to be only partially beneficial. We need to remember that these tools and advisors are currently in their infancy. We must apply our DBA experience and knowledge to thoroughly evaluate the advisor recommendations. Currently, they are not a total replacement for DBA tuning expertise. A very good start though.
Wrapup
We will test the new index in our development environments. I am sure they will
help reduce our CPU consumption during this time period. I'll run another ADDM
task on the 4 AM to 8 AM timeframe and I'll let you know the results in an upcoming
blog. But I know it will work (applying my own experience here).
A Final Recommendation
Take some advice from your friendly ex-Oracle instructor. LEARN HOW TO USE
THESE TOOLS. I can't emphasis that statement strongly enough. As I stated,
ADDM and the intelligent advisors may not currently be a total replacement for
DBA experience and expertise, but sooner or later, they most definitely will
be. Don't get left behind - because its only a matter of time.
Thanks for reading.

